We’ll approach lithium charger troubleshooting in a disciplined, evidence-based way, confirming power at the outlet, the unit’s power-on cues, and the integrity of cables, connectors, and fuses. We’ll test under load with calibrated instruments, compare results to spec, and separate charger faults from battery health. If we spot inconsistencies, we reseat connections and swap in known-good components, escalating with logs if needed. The next step will sharpen our focus on where the issue truly lies.
Key Takeaways
- Verify power source, cable integrity, and charger compatibility (voltage, current, polarity) with a known-good meter and connections.
- Inspect cables, connectors, and inline adapters for wear, looseness, corrosion, or damage; reseat or replace as needed.
- Measure charger output under load and compare to battery specs; note stability, indicators, and any abnormal readings.
- Test both charger and battery independently (and with known-good units) to isolate charger vs. battery faults.
- Document readings, labels, and conditions; escalate with diagnostic logs if anomalies persist.
Diagnose the Problem: Is It the Charger or the Battery?
To diagnose whether the charger or the battery is at fault, start with a simple, systematic check. We run controlled tests to isolate variables, document readings, and compare results against known specs. First, verify the charger’s output under load with a calibrated meter, noting voltage, current, and stability. Next, inspect cabling, connectors, and safety protocols for corrosion or damage, replacing any compromised components. If the charger remains within spec, assess the battery: voltage under rest, voltage recovery after a load, and present capacity relative to rating. Track any signs of battery degradation, such as reduced run time or unexpected temperature rise. If anomalies persist, escalate with formal safety protocols and diagnostic logs to determine root cause. We prioritize precise measurements and repeatable steps.
Quick Checks to Rule Out Obvious Power Problems
We start by checking the power source to guarantee it delivers steady voltage and sufficient current for charging. Next, we inspect the charging cable for damage, loose connections, or wear that could interrupt power delivery. If the source and cable check out, we confirm the charger and connector meet the battery’s specifications to rule out simple power faults.
Check Power Source
Who supplies the power, and is it delivering it reliably? We start, methodically, by confirming the source basics before diagnostics. Check the outlet voltage with a reliable meter, note any fluctuations, and test multiple receptacles if readings vary. Verify that the charger input matches the device’s requirements, including voltage, amperage, and polarity. Inspect for damaged plugs, frayed cords, or loose connections at the wall, adapter, and charger end. Rule out nonstandard power strips or surge protectors that can introduce impedance or intermittent contact. Consider design considerations that affect performance, such as cable length and conductor gauge, which influence voltage drop under load. Finally, remember warranty implications: misused power sources can void coverage, so document findings and maintain compliance with the manufacturer’s guidelines.
Inspect Charging Cable
Could subtle cable issues be hiding bigger power problems? We examine the charging cable itself as a first check. Inspect connectors for corrosion, bent pins, or looseness, and test both ends in firm contact with the device and charger. Use a known-good cable to compare behavior; if the device charges differently or intermittently, replace the suspect cable. Check insulation for nicks, cuts, or exposed conductors that could cause short or heat. Verify cable length and gauge are appropriate for the charger’s amperage; overlong, thin cables can introduce voltage drop. Avoid using damaged cables; this protects battery safety and preserves charging etiquette by preventing unsafe charging conditions and wasted cycles. After replacement, monitor for consistent voltage, heat, and charging cadence.
Signs That Point to the Charger vs. the Battery
When diagnosing whether the charger or the battery is at fault, start by checking symptoms that consistently point to the charger, such as a charger that fails to establish a proper voltage or intermittently disconnects, even when the battery tests good. If voltage readings fluctuate or fall outside specified charging curves, the charger is implicated. Consistent acceptance of a low current, delayed start, or abnormal termination indicates charger fault, not cell chemistry. Look for charging compatibility issues: mismatched voltage, current limits, or temperature alarms that persist across multiple batteries. Battery-only symptoms—slow or no charging, rapid voltage drop after connection—suggest battery health. Always follow safety protocols, isolate the causes, and document results to avoid cross-contamination of symptoms.
Test Ports and Cables for Looseness
Ports and cables can masquerade as the fault behind intermittent charging, so we start by inspecting every connection for looseness. We check the charger’s output jack, the battery adapter, and any inline connectors for play or wobble. If a jack or plug feels loose, we reseat and re-tighten as permitted, then test for stability with a gentle tug. We compare plug fits against spec or manufacturer guidance to detect excessive play. Next, we inspect cable wear: frayed insulation, exposed conductors, and kinks or bends near joints indicate degraded performance. We replace damaged sections or the entire cord promptly. We also verify that connector pins align properly and aren’t bent. Document findings, reseat all connections, and retest charging to confirm that looseness isn’t the cause of erratic behavior.
Verify Input Power and Outlet Conditions
To verify input power and outlet conditions, we start at the source and confirm the charger and outlet supply are within specification. We test the AC outlet voltage with a calibrated meter, note the range, and compare it to the charger’s rated input. We inspect the power cord for damage, loose conductors, and proper plug fit. We verify circuit integrity at the breaker or fuse, ensuring no tripped or overheating indicators. We assess compatibility with supplied voltage and frequency, and confirm no interference from nearby high-power devices. We document readings to prevent potentate misconceptions about minor deviations. We conduct intermittent fault finding by repeating measurements after load changes and noting any inconsistent results, then proceed only if stability is established. This rigorous checksheet helps isolate issues before deeper diagnostics.
Safe, At-Home Battery Health Assessment
We’ve confirmed the power supply and wiring, so we can turn to evaluating battery health safely at home. Our approach is practical and repeatable, focusing on non-destructive checks that inform ongoing charging etiquette. We begin with visible inspection: casing integrity, swelling, and signs of heat during gentle charging sessions. Next, we verify external connections for corrosion and secure, clean contacts before any testing. We measure basic voltage and compare against manufacturer guidance to detect anomalies without stressing the cell chemistry. If readings deviate, we pause and recheck connections, then document results for trend analysis. Emphasize battery safety throughout: avoid punctures, never expose to extreme temperatures, and disconnect if anomalies appear. Maintain records, follow recommended intervals, and restrict work to approved safety practices during at-home assessments.
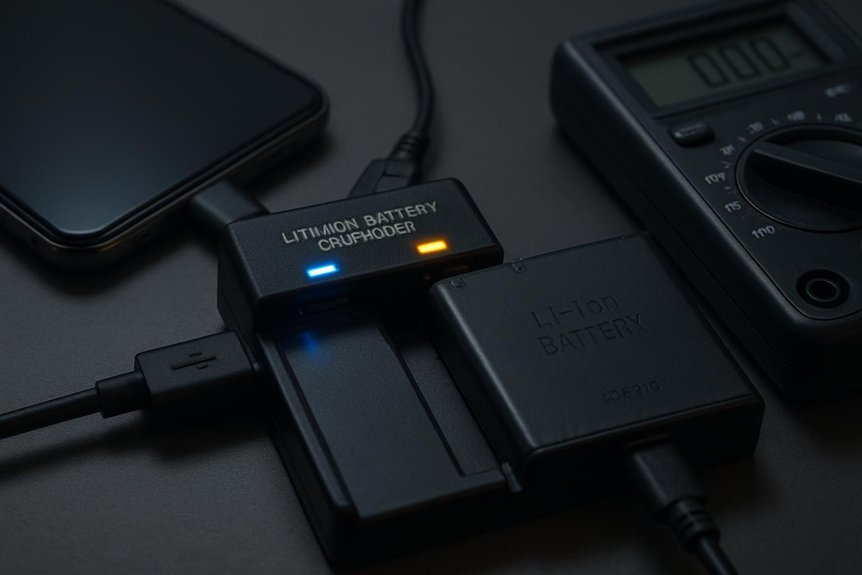
Troubleshoot Charger Indicators and No-Response Faults
We’ll start by verifying indicator light behavior, mapping what each signal should mean and spotting anomalies. If there’s no response, we’ll diagnose connectivity, power delivery, and potential fault states in the charger or battery. We’ll document findings and proceed with targeted checks on indicator patterns, charger connections, and cycle timing to isolate the issue.
Indicator Light Troubles
When a charger’s indicator lights misbehave or don’t respond at all, we start with a systematic check of status LEDs and the charger’s self-test results. We then assess how the indicators reflect battery load, capacity state, and cycling integrity, noting any mismatch between LED patterns and actual conditions.
- Confirm that the indicator sequence matches the documented states during initial power-up and steady operation.
- Verify that a failing self-test corresponds to a specific fault code and correlates with battery capacity readings.
- Cross-check cycling integrity by comparing expected indicator behavior across multiple charge-discharge cycles and looking for consistent deviations.
No-Response Diagnosis
How can we quickly isolate a charger that shows no response to any input? We begin with a systematic check of indicators and inputs. Confirm power is applied at the outlet and that the unit powers on, noting any audible or visual cues. Inspect charger labeling for model, serial, and intended battery chemistry, and verify it matches the battery pack. Check the power rating to ensure compatibility with the target cell count and required current. If possible, test with a known-good cable or adapter to rule out external faults. Examine fuses and internal fuses or protection diodes for signs of open or short circuits. Document results, then proceed only if labeling and rating align with the battery to avoid misapplication. Avoid assumptions; base steps on measurable evidence.
Charger Connection Issues
Have you confirmed the charger’s indicators reflect a proper power connection before diagnosing deeper faults? In this section, we focus on connection reliability and indicator interpretation, then move to no-response faults. We assess charger compatibility and cable durability as core variables affecting performance. Follow this methodical check:
- Verify LED/display behavior matches the charger’s specification for power presence.
- Inspect the plug, socket, and inline cable for looseness, corrosion, or damage; replace if compromised.
- Swap with a known-good unit to isolate the fault, confirming whether the issue lies with charger or battery.
If indicators stay faint or absent after swapping, re-evaluate wiring length, adapter ratings, and ambient temperature.
USB-C, Fast-Charge Quirks, and Cordless Tool Battery Issues
USB-C fast charging and cordless tool batteries introduce a few quirks that can trip up performance. We outline practical checks to prevent misreads, misfires, and safety risks. First, verify charger compatibility with battery chemistry and safety protocols. Confirm cable gauge, current limits, and connector integrity before charging. Monitor temperature rise and auto-shutoff behavior to avoid thermal damage. If a tool battery appears undercharged or refuses to charge, test with a known-good charger and different cable. Document observed quirks for future reference and align procedures with safety protocols.
| Scenario | Action | Expected Result |
|---|---|---|
| Quick discharge | Swap charger | Normal refill cycle |
| Slow wake | Re-seat connections | Power resumes |
| Overheat | Remove power, inspect | Safe cooldown |
| Fault code | Check battery chemistry | Correct fault handling |
Proactive Steps to Prevent Future Charger Troubles
We’ll implement a proactive, methodical routine to minimize charger trouble before it starts. We outline practical steps that reinforce reliability and protect lifespan. By aligning charger etiquette with device needs, we reduce error states and heat buildup while preserving battery geometry integrity.
1) Establish a consistent charging window and controlled environment to limit voltage fluctuations and temperature spikes.
2) Verify connectors, cables, and adapters for compatibility, wear, and cleanliness to prevent impedance changes and misreads.
3) Schedule periodic diagnostics and calibration checks to monitor cell balance, current rating, and electrolyte behavior that influence longevity.
Together, these steps sustain safe charging, minimize surprises, and extend usable life without extra complexity.
When to Replace or Seek Professional Service
If you’ve followed our proactive steps, you’ll know how to spot early signs of charger stress and battery strain. We’ll now outline when to replace or seek professional service. First, consider performance degradation: persistent capacity loss, rapid voltage drop, or unusable cycles indicate replacement may be due. Next, check safety indicators: swelling, overheating beyond normal operating range, or venting odors require immediate professional assessment. Consider battery chemistry: if aging chemistry reduces efficiency or creates abnormal impedance, replacement often becomes cost-effective. Storage temperature matters too; repeated exposure outside recommended ranges accelerates degradation and can void warranties. For complex faults, such as suspected internal shorts or protection circuitry failures, don’t DIY—request certified service. Always document dates, symptoms, and measurements to support diagnostic accuracy and timely decision-making.
Frequently Asked Questions
How Do I Identify a Failing Charger Port on the Device?
We identify a failing charger port by visual inspection for corrosion, looseness, or bent pins, then perform charger port diagnostics with a multimeter and test adapters, checking charger cable reliability and consistency of supply.
Can a Low-Quality Cable Cause Charging to Stop Intermittently?
Yes, a low-quality cable can cause charging interruptions. A faulty cable undermines charging stability, so we test with a known good cable first, then confirm the power supply and port integrity to rule out related faults.
Do Chargers With LED Indicators Always Reflect Real Battery Status?
No, LED indicators don’t always reflect real battery status; LED indicators misread possible. We caution that charger port wear and load fluctuations can mislead readings, so we verify with direct voltage checks and battery metrics before conclusions.
Can Ambient Temperature Affect Charging Efficiency or Safety?
“Time is money,” we remind you: Yes, ambient temperature affects charging efficiency and safety. We monitor ambient temperature carefully, adjusting charging parameters to minimize risk and optimize performance for every battery, device, and charger, with precise, methodical checks.
What Warranty Coverage Applies to Charger Defects vs. Battery Faults?
We provide charger warranty coverage for defects in the charger itself, and battery fault coverage for faults in the battery pack. We assess claims methodically, determine cause, and apply relevant terms to guarantee accurate, prompt repair or replacement.
Conclusion
We’ve walked the winding road of diagnosis together, like navigators steering a ship through fog toward clear waters. When the charger hums and the battery sighs, we don’t chase shadows—we chart currents: test power, reseat connections, swap known-good parts, log symptoms, and compare to specs. If the north star still doesn’t align, we replace or seek help. In essence, care for the tool, and it reveals its true charge—and truth—back to us.

