Imagine the quiet hum of a correctly wired RV, every cable tucked and labeled with intent. We’ll discuss a disciplined approach to installing lithium battery banks that meets safety, compliance, and reliability goals. From chemistry choice to SOC accuracy, from fuse sizing to BMS setup, we’ll outline practical steps, common traps, and a long-term maintenance mindset. Join us as we map a methodical path that keeps systems safe and ready, with each detail guiding you toward a sound installation.
Key Takeaways
- Choose the right chemistry (LiFePO4, NMC, or LiPo) based on energy density, safety, cycle life, and budget for RV off-grid use.
- Precisely estimate daily loads, add reserve, account for weather, inverter losses, and charging gaps to size the bank.
- Ensure enclosure, ventilation, temperature control, PPE, and adherence to local codes during installation.
- Plan wiring with proper fuse sizing, robust bus layout, clear labeling, and separate positive/negative runs with a main disconnect.
- Implement fault alerts, continuous monitoring, and a maintenance plan with testing, calibration, and proactive safety actions.
Choose Your RV Lithium Chemistry: Pros, Cons, and Fit
Choosing the right RV lithium chemistry hinges on balancing energy density, cycle life, safety, and cost, so we’ll compare the main options—LiFePO4, NMC, and LiPo—against typical RV usage. We present a methodical, data-driven assessment of each chemistry’s fit for off-grid, boondocking, and high-drain scenes. LiFePO4 offers robust cycle life, thermal stability, and lower cost per cycle, with moderate energy density and safer failure modes. NMC provides higher energy density for lighter rigs but demands stricter thermal management and higher upfront price. LiPo delivers compact packs and peak power, yet at the expense of safety margins and lifecycle costs. We weigh pricing models and supplier ethics to guide transparent, repeatable purchasing choices aligned with expected duty cycles and maintenance practices.
Estimate Your True Battery Needs for RV Trips
We start by estimating daily energy usage and then add a planned reserve to ensure reliability on unforeseen events. We’ll quantify consumption per device, multiply by projected trip days, and include a safety margin to cover weather and variable loads. This methodical approach yields a true battery size that supports consistent operation without overestimating capacity.
Estimate Daily Usage
How much energy will you actually use each day on an RV trip? We quantify daily consumption by listing essential loads, estimating duty cycles, and applying measured voltage and current profiles. We combine refrigerator, lighting, water pump, fans, electronics, and occasional charging into a total watt-hour target, then convert to amps for our 12V or 24V system. We model peak draw versus average draw, account for inverter losses, and include a buffer for startup surges. We document baseline scenarios for off-grid days and periods with shore power, guiding us to set a realistic daily energy budget. We integrate drainage planning and exterior weatherproofing considerations to ensure system reliability, then refine estimates with actual usage logs to optimize battery sizing and cycling strategy.
Plan Battery Reserve
Planning the battery reserve starts with translating our daily energy budget into a practical storage target, then validating it against typical trip patterns and charging opportunities. We approach reserve planning by framing a conservative target that accounts for peak loads, weather, and system losses, while avoiding gaps from missing context. This method yields a defensible reserve that covers unexpected draws without over-sizing.
- Define daily energy use, then add a safety margin to accommodate high-demand days and charging gaps.
- Map trip patterns (distance, season) to determine runtime between top-offs and generator or solar windows.
- Validate with system loss estimates, battery aging, and margin for unrelated topic events that could shift consumption.
Size Your RV Battery Bank Based on Real Loads
Are real-load assessments the most reliable way to size an RV battery bank? Yes, we base sizing on measured consumption rather than estimates. First, catalog every device’s draw in watts and its typical duty cycle, then convert to amp-hours at our system voltage. Next, aggregate 24–72 hours of diverse usage to define a representative load profile, accounting for seasonal variations. We then apply a safety margin—typically 20–40%—to cover unexpected spikes and aging. Match the resulting amp-hour target to a bank configuration that minimizes high-current pulls, reduces voltage sag, and maintains efficient charging. Finally, document derating factors and verify with a practical load test. Avoiding overshoot prevents evaporation risk and thermal runaway risks during high-demand events.
Essential Safety Features and Installation Prerequisites
Safety is our top priority when installing a lithium battery system, and we approach it methodically by outlining key safety features and prerequisites before any wiring or mounting begins. We focus on material handling, protective gear, and clear procedure steps to minimize risk, while avoiding unrelated topics and off topic ideas that derail accuracy. Our prerequisites ensure proper enclosure, ventilation, and environmental controls, plus adherence to manufacturer manuals and local codes.
Safety-first lithium battery setup with strict PPE, handling, and pre-installation checks guided by manuals and codes.
1) Verify enclosure integrity, ventilation, and temperature limits before any component handling.
2) Confirm PPE, safe lifting practices, and fall-protection measures are in place for installation work.
3) Review compliance documents, wiring isolation plans, and emergency shutdown procedures to prevent accidental energization.
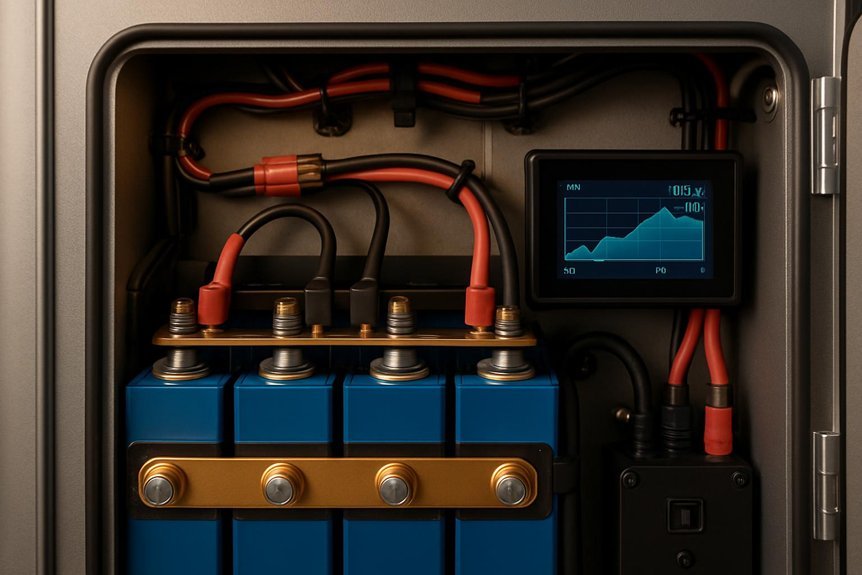
Wiring Basics for RV Lithium Banks: Fuses, Bus Bars, and Connectors
What’s the simplest, most reliable way to wire RV lithium banks for safety and performance? We approach this with a disciplined, repeatable method. We standardize fuse sizing at each branch circuit based on wire gauge, anticipated load, and manufacturer recommendations, then protect every conductor within its current rating. We select a robust bus bar layout that minimizes path length, reduces resistance, and centralizes main parallels for even current sharing. We clearly label all connections and verify torque specs to prevent microscopic warm spots. We use high-quality connectors rated for DC, with corrosion resistance and back-stab avoidance. We separate negative and positive runs, maintain clean insulation, and implement a dedicated main disconnect. Finally, we document wiring diagrams and test with a regulated current source before charging.
Integrating Shore Power, Solar, and Alternator Charging
Integrating shore power, solar, and alternator charging requires a coordinated charging strategy that keeps sources from fighting each other and ensures consistent voltage and current handling.
We present a concise framework to align sources without conflicts, focusing on load sharing, voltage setpoints, and safety interlocks. Our approach relies on precise prioritization, proper sequencing, and adherence to manufacturer guidelines to prevent overcharging or parasitic drain. By calibrating charge profiles and monitoring state of charge, we minimize ripple, heat, and cycling stress. Communication between power sources through a common battery management interface enables real-time priority adjustments and fault isolation. This methodical setup supports reliable operation across varying environments and loads.
- Prioritize sources based on availability and charging stage
- Synchronize voltages, current limits, and timing via BMS interfaces
- Validate with staged testing and safety interlocks
Battery Management and Monitoring You Can’t Ignore
We’ll start with clear battery runtime monitoring, so you know when capacity is dropping and what that means for trips. We’ll outline safe charging practices and how to implement fault alert systems that trigger promptly without false alarms. Together, these elements form the core of reliable, proactive battery management that you can’t ignore.
Battery Runtime Monitoring
Battery runtime monitoring is essential for RV lithium systems, and we should establish a clear, continuous process to track energy use against available capacity. We present a disciplined approach to quantify consumption, forecast state of charge, and detect deviations from expected performance. Our focus is on data integrity, consistent cadence, and actionable thresholds that keep us aligned with battery health and system goals.
1) Establish a monitoring cadence that matches load variability and seasonality, updating SOC estimates at defined intervals.
2) Use calibrated sensors and loggers to record voltage, current, temperature, and amp-hours, validating results against baseline bank performance.
3) Implement alerting thresholds for rapid drops in remaining runtime, triggering inspection or load-shedding protocols when necessary.
Safe Charging Practices
Safe charging requires disciplined battery management and real-time monitoring to protect longevity and performance. We’ll outline practices that minimize aging, ensure safety, and maximize efficiency during charging cycles. First, we verify that all connections use clean wiring and corrosion-free terminals, then confirm proper fuse sizing and breaker coordination to prevent overcurrent events. We adopt a consistent charging profile aligned with the battery’s specifications, avoiding high-rate starts after deep discharges. Temperature readouts guide our decisions; we pause charging if ambient or pack temps exceed recommended thresholds. Regular balance checks prevent cell drift, and we log voltages, currents, and temperatures for trend analysis. Heat management is critical—ensure ventilation, insulating barriers are correct, and avoid enclosure shading that traps heat. Finally, we review charger compatibility and update firmware as needed.
Fault Alert Systems
How can we ensure you’re alerted the moment something deviates from normal when managing RV lithium batteries? We implement fault alert systems and rigorous system diagnostics to detect anomalies early and trigger prompt responses. Our approach centers on clear thresholds, continuous monitoring, and prioritized alerts that differentiate benign fluctuations from real risks. We configure multi-sensor checks for voltage, current, temperature, and state of charge, with fail-safes to halt charging or discharging when limits are exceeded. Documentation provides actionable next steps, minimizing downtime and hazard. Regular calibration ensures accuracy, while remote dashboards supply real-time visibility. Proactive maintenance reduces surprises and extends pack life.
- Threshold calibration and fault alert prioritization
- Continuous sensor health and system diagnostics checks
- Automated safety actions and escalation protocols
Common RV Lithium Install Pitfalls and How to Avoid Them
What are the most common missteps when installing RV lithium batteries, and how can we prevent them from disrupting performance or safety? We approach this topic with a focus on wiring discipline, enclosure integrity, and venting discipline. Avoid mixing chemistries, oversized cables, or undersized fuses, which raise resistance, heat, and failure risk. Confirm battery management system configuration matches our battery type, and verify SOC indicators align with actual state. Maintain proper cable routing to minimize vibration impact and guard against physical damage. Ensure venting provisions are appropriate for any required battery venting and that enclosures are sealed against moisture ingress. Address corrosion risk proactively by cleaning terminals and applying protectants before connections. Finally, document all settings and inspection intervals to sustain long-term reliability and safety.
Step-by-Step Mounting and Physical Installation Checklist
Before mounting, we establish a rigid physical installation plan: verify the chassis and enclosure are rated for lithium use, confirm mounting surfaces are flat and vibration-tolerant, and outline cable paths that avoid sharp edges. We proceed with controlled steps to ensure install safety and respect battery chemistry considerations.
- Secure the battery tray to a rigid base, aligning factory holes, then torques to spec.
- Route cables away from heat sources and moving parts, using grommets and protective sleeves; add strain relief at terminations.
- Install a ventilation or cooling path as required by the cell chemistry, and recheck clearances, torque values, and load distribution.
We verify seals, interconnect integrity, and label all connections for future service.
Final Hookup, Testing, and Long-Term Maintenance Plan
We’ll cover final hookup steps, verifying all connections and safety interlocks, then run the prescribed testing protocols to confirm system integrity. We’ll document results, interpret any deviations, and establish a repeatable maintenance cadence to protect the battery pack and RV electrical system. We’ll outline a long-term plan that includes periodic inspections, cell voltage checks, thermal monitoring, and proactive replacement intervals.
Final Hookup Procedures
During final hookup, we verify all connections, secure mounting, and confirm system integrity before operation. We’re concise and methodical, ensuring every step supports long-term reliability. We address wiring, fusing, battery monitoring, and enclosure bleed paths, noting how reliability tradeoffs influence layout choices and safety margins. Temperature sensitivity is considered in cable routing and enclosure ventilation to prevent performance drift.
- Confirm torque on terminals, verify insulation integrity, and record connection IDs for future reference.
- Mount batteries firmly, check vibration isolation, and validate enclosure seals and thermal management.
- Power-up procedure: perform initial BMS wake, verify voltage balance, and confirm system annunciations match the schematic.
We document results succinctly, ready for future maintenance without redundancy.
Testing Protocols and Results
We now apply a rigorous testing regime to the Final Hookup, ensuring all connections, mounts, and protection schemes perform under real-world conditions. Our protocol centers on stepwise verification: insulation integrity, thermal response, impedance checks, and fuse/isolator behavior under load. We simulate ambient swings, rapid discharge/recharge cycles, and vibration to confirm mounting stability and connector retention. Data logging captures voltage, current, and temperature trends, with pass/fail criteria defined before tests commence. We document deviations and corrective actions in a concise punch list, preventing scope creep. We avoid unrelated topic distractions and maintain focus on system interoperability. Results confirm expected performance margins, with margins quantified and recorded. We conclude with a brief, actionable summary of refinements, ready for the field, and note any off topic discussion that does not affect safety or legality is outside this report.
Long-Term Maintenance Plan
How will we ensure long-term reliability of the Final Hookup, Testing, and Long-Term Maintenance Plan through proactive upkeep and evidence-based adjustments? We approach this with disciplined procedures, routine checks, and traceable data. Our emphasis is on chemistry selection compatibility, consistent cell balancing, and monitoring for voltage drift to prevent degradation. We align maintenance actions with warranty coverage terms to guarantee timely support and documentation. The following steps codify our plan:
- Schedule periodic inspection intervals, verification of connections, and parasitic load assessment.
- Log temperature, voltage, and state-of-charge trends; trigger adjustments based on predefined thresholds.
- Validate documentation, update the chemistry selection records, and review warranty coverage after every service.
Frequently Asked Questions
How Do Lithium Batteries Affect RV Insurance Requirements?
We can confirm lithium batteries affect insurance implications by potentially altering terms, premiums, and coverage limits; ensure wiring, installation, and venting meet standards. We account for warranty coverage, disclosure, and manufacturer documentation when evaluating risk and claims.
Can I Upgrade a Lead-Acid Circuit Without Rewiring?
We can upgrade a lead-acid circuit without rewiring; no rewiring required, wiring changes not needed. We assess compatibility, isolate loads, and implement proper sizing and protection, ensuring safe, code-compliant integration for upgraded system reliability.
What Are Hidden Costs of Lithium Installation Beyond Batteries?
Hidden costs include BMS integration, wiring harness upgrades, fuses, and monitoring hardware; these affect installation timelines. We’ll assess battery management, gauge compatibility, and system cooling to craft a precise installation timeline with minimal downtime.
Do Lithium Cells Require Venting in an RV Cabinet?
Yes, lithium venting is typically required; we recommend cabinet placement with proper, sealed ventilation and venting path. We, readers, request careful monitoring, maintaining margins, and methodical measurements to prevent buildup, preventing hazardous gas accumulation and ensuring safe operation.
How Often Should I Calibrate Battery Management System Alarms?
We calibrate battery management system alarms every 6 months, unless usage or conditions demand sooner. This calibration frequency ensures alarm thresholds remain accurate; we document results and adjust alarm thresholds as needed to maintain safe, reliable operation.
Conclusion
We’ve wired safety into every connection, like a lighthouse guiding a ship through a storm. Our installation is a compass: every fuse, every vent, every BMS setting points true north toward reliability. When you test and monitor, you’re not just checking volts—you’re confirming trust. Mount, connect, and document as one ritual: safety first, performance second, maintenance always. With this protocol, the battery becomes an enduring map, steering you safely across every off‑grid horizon.

